
Widgets#
Author: Mike Wood
Learning Objectives: By the end of this notebook, you should be able to:
List common widgets available in Tkinter
Add widgets to a GUI using the grid framework
Tkinter Widgets#
“Widgets” are added to a GUI to give it functionality. The tkinter package has access to a variety of Tk widgets that allow you to build in functionality to your
programs. The following table lists many of the common widgets used in GUIs:
Widget |
Description |
|---|---|
Frame |
a “bin” to organize different sections of your application window |
Label |
a text or image shown on the screen |
Button |
a clickable feature typically designed to call a function |
Combobox |
a “dropdown menu” to choose from a list of options |
Entry |
a space for the user to type text |
Checkbutton |
a stand-alone button that has states for on and off |
MenuButton |
a button associated with a text label with states for on and off |
RadioButton |
similar to a MenuButton but in a slightly different style |
Scale |
a scroll-bar like feature |
Canvas |
a widget to draw graphs and plots |
ListBox |
a box showing a list of selectable options |
TreeView |
a hierarchical display of items (e.g. files in a file system) |
Progressbar |
a bar showing the progress of a (long-running) application |
A list of the themed widget is described at https://docs.python.org/3/library/tkinter.ttk.html#widget.
A Widget Example#
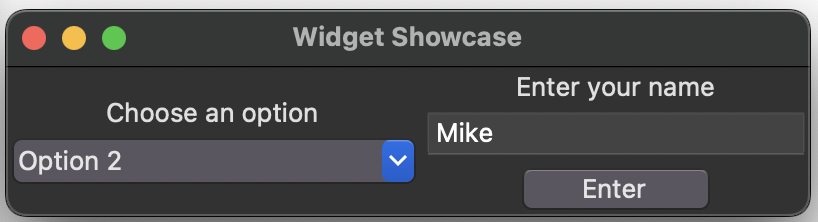
The widget_display.py example script provides a showcase of some of the widgets available in tkinter as shown in the following screenshot:
The above widget is generated with the following code:
# this is a GUI to showcase a few of the widgets in tkinter

# import tkinter
from tkinter import *
from tkinter import ttk

# define a class called WidgetDisplay
class WidgetDisplay:

    # define an __init__ method with root as an argument
    def __init__(self, root):

        # add a title for the GUI
        root.title("Widget Showcase")

        # add a frame to the GUI
        first_frame = ttk.Frame(root)
        first_frame.grid(column=0, row=0)

        # add a label to the first frame and add it to the GUI
        label = ttk.Label(first_frame, text="Choose an option")
        label.grid(column=0, row=0)

        # add a ComboBox to the first frame and add it to the GUI
        label = ttk.Combobox(first_frame, values=['Option 1','Option 2','Option 3'])
        label.grid(column=0, row=1)

        # add a second frame to the GUI
        second_frame = ttk.Frame(root)
        second_frame.grid(column=1, row=0)

        # add a label to the second frame and add it to the GUI
        label = ttk.Label(second_frame, text="Enter your name")
        label.grid(column=0, row=0)

        # add an Entry to the second frame and add it to the GUI
        label = ttk.Entry(second_frame)
        label.grid(column=0, row=1)

        # add a Button to the second frame and add it to the GUI
        label = ttk.Button(second_frame, text="Enter")
        label.grid(column=0, row=2)


# create a root Tk object
root = Tk()

# create a WidgetDisplay object with the Tk root object as an argument
WidgetDisplay(root)

# call the mainloop method on the Tk root object
root.mainloop()
Placing Widgets in the GUI#
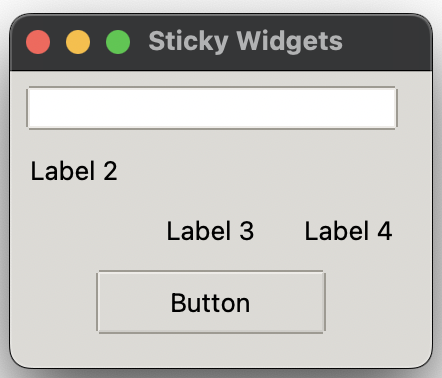
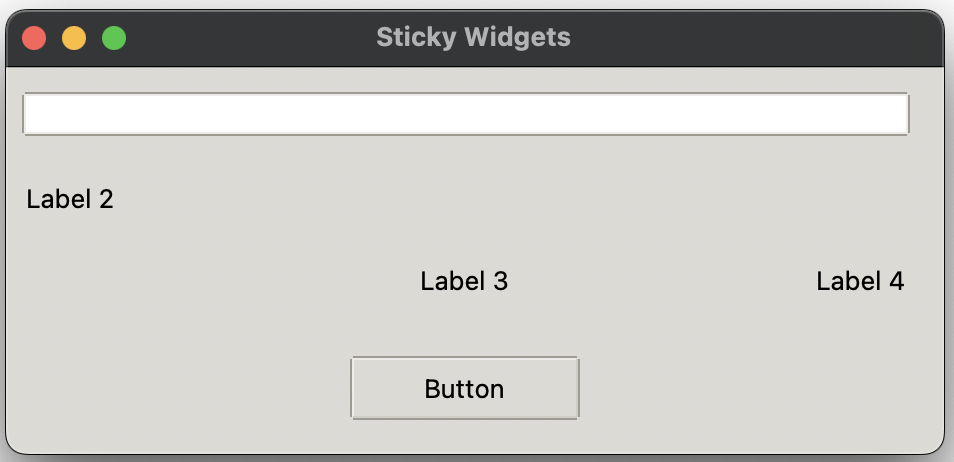
As you may have seen in the previous examples, the window will shrink to the size of the widgets. By default, the widgets will be “packed” into the upper left of the window and remain there, even if the window is resized. To control the sizes and placements of widgets when the window is resized, the collection of commands including the “stickiness” of the widgets needs to be defined.
# this is a GUI to test widget "stickiness"

# import the tkinter module
from tkinter import *
from tkinter import ttk

# create a StickyWidgets class
class StickyWidgets:

    # define the init function
    def __init__(self, root):

        # add a title to the GUI
        root.title("Sticky Widgets")

        # change the style of the root to one of the following:
        #   all platforms: alt, clam, classic, default
        #   Windows: vista, winnative, xpnative
        #   Mac: aqua
        style = ttk.Style(root)
        style.theme_use('clam')

        # configure the root so that it stretches in all directions
        root.columnconfigure(0, weight=1)
        root.rowconfigure(0, weight=1)

        # add a main frame and add it to the window
        # add padding on the main frame
        # make the mainframe sticky in all directions
        # and add it to row 1 and column 2 of the main frame
        mainframe = ttk.Frame(root, padding = "3 3 12 12")
        mainframe.grid(column=0, row=0, sticky=(N, W, E, S))

        # configure the mainframe so that it stretches in all directions
        # for rows 0-3 and columns 0-3
        for i in range(4):
            mainframe.columnconfigure(i, weight=1)
            mainframe.rowconfigure(i, weight=1)

        # make an entry widget which is sticky in the W/E directions
        feet_entry = ttk.Entry(mainframe)
        feet_entry.grid(column=0, row=0, sticky = "we",columnspan=4)

        # make labels widgets which are sticky in the W direction
        ttk.Label(mainframe, text='Label 1').grid(column=0, row=1, sticky=W)
        ttk.Label(mainframe,text="Label 2").grid(column=0, row=1, sticky=W)

        # make labels widgets which are sticky in the E direction
        ttk.Label(mainframe, text="Label 3").grid(column=1, row=2, sticky=E)
        ttk.Label(mainframe, text="Label 4").grid(column=3, row=2, sticky=E)

        # make a Button widget which is sticky in the S directions
        # and centered in row 3
        ttk.Button(mainframe, text="Button").grid(column=0, row=3, sticky=S, columnspan=4)

        # pad each of the widgets with a pixel size of 5 in both
        # the x and the y directions
        for child in mainframe.winfo_children():
            child.grid_configure(padx=5, pady=5)

# create a root Tk object
root = Tk()

# create a StickyWidgets object with the Tk root object as an argument
StickyWidgets(root)

# call the mainloop method on the Tk root object
root.mainloop()