
Additional Windows#
Author: Mike Wood
Learning Objectives: By the end of this notebook, you should be able to:
Generate new windows that open from root windows
Add pop-up windows such as messages and errors
Add a top-bar file menu to a GUI
New Windows#
In this example, we’ll see how we can create new windows from our application. Take a look at the following example:
# a GUI with some test pop-up windows

# import the tkinter package
from tkinter import *
from tkinter import ttk
from tkinter.messagebox import showinfo

# create a class called PopupWindows
class PopupWindows:

    # add an init functions for this class
    def __init__(self, root):

        # Add a title to the window
        root.title("Pop-Up Windows")

        # Define the geometry of the window
        root.geometry("500x200")

        # Configure the root so that it stretches in all directions
        root.columnconfigure(0, weight=1)
        root.rowconfigure(0, weight=1)

        # make a frame for the GUI
        self.frame = ttk.Frame(root, padding = "10 10 10 10")
        self.frame.grid(column=0, row=0, sticky=(N, W, E, S))

        # weight column to expand with the window
        self.frame.columnconfigure(0, weight=1)

        # add a label for the new window
        label = ttk.Label(self.frame,
                          text="Click this button to open a new window:")
        label.grid(column=0, row=0, sticky=(N, W, E, S))

        # add a button for the new window
        self.button_new_window = ttk.Button(self.frame,
                                       text="New Window",
                                       command=self.another_window)
        self.button_new_window.grid(column=0, row=1, sticky=(N, W, E, S))

        # add a label for the message display
        label = ttk.Label(self.frame,
                          text="Click this button to display a message:")
        label.grid(column=0, row=2, sticky=(N, W, E, S))

        # add a button for the message display
        self.button_showinfo = ttk.Button(self.frame,
                                          text="Show Info",
                                          command=self.showinfo_popup)
        self.button_showinfo.grid(column=0, row=3, sticky=(N, W, E, S))

        # add a label for the closing of the app
        label = ttk.Label(self.frame,
                          text="Click this button to close the application:")
        label.grid(column=0, row=4, sticky=(N, W, E, S))

        # add a button to close the app
        self.button_showinfo = ttk.Button(self.frame,
                                          text="Close",
                                          command=root.destroy)
        self.button_showinfo.grid(column=0, row=5, sticky=(N, W, E, S))


    # define a function to open a new window
    # using a Toplevel object
    # add a label and a button to close the window
    def another_window(self):
        win = Toplevel()
        win.title("Another Window")

        label = ttk.Label(win, text="New widgets go here")
        label.grid(row=0, column=0)

        close_button = ttk.Button(win, text="Close", command=win.destroy)
        close_button.grid(row=1, column=0)


    # define a function to display some info using
    # the showinfo function
    def showinfo_popup(self):
        showinfo("Window", "This window contains some info")

# create a root Tk object
root = Tk()

# create a PopupWindows object with the Tk root object as an argument
PopupWindows(root)

# call the mainloop method on the Tk root object
root.mainloop()
This script generates the following GUI along with the new window and pop-up shown to the right:
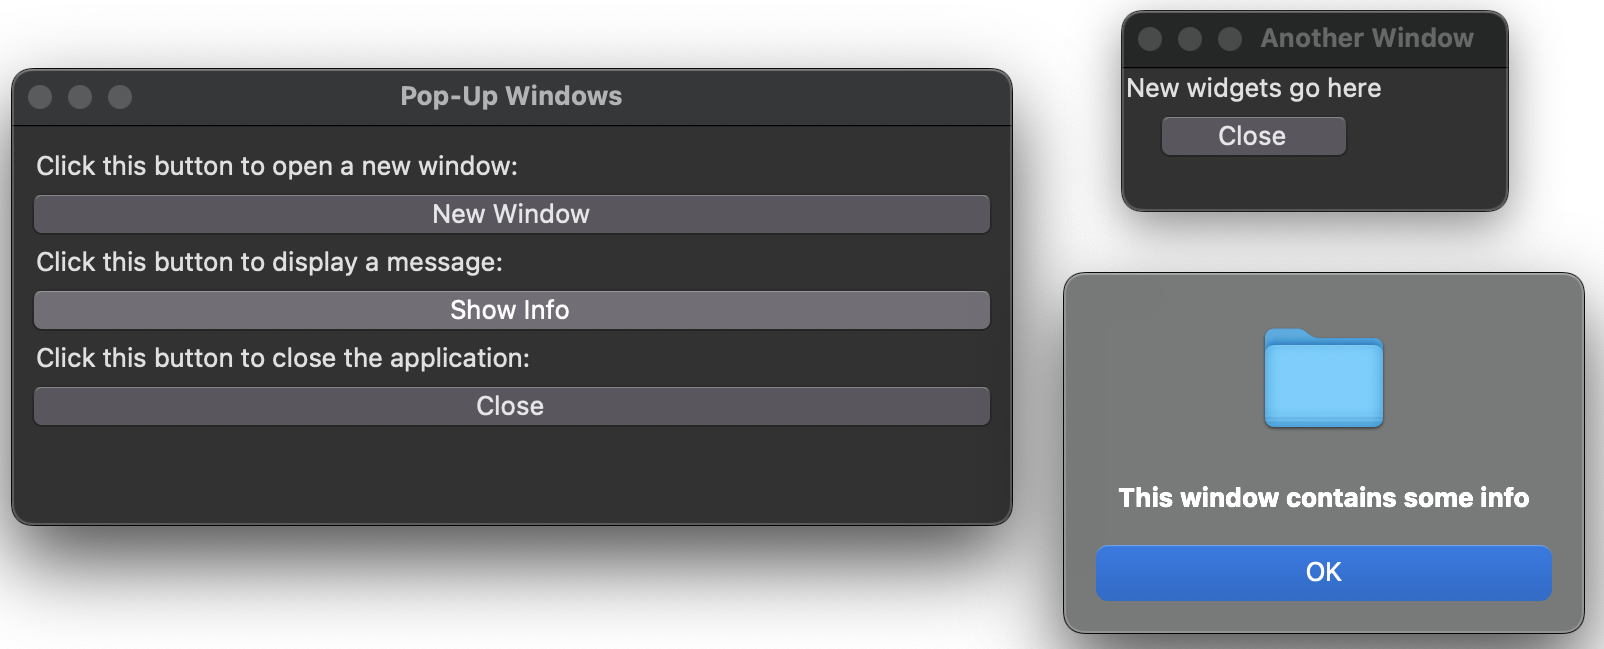
This script has several new features. Let’s summarize:
Top Level Windows#
In the first part of the script, we bind a function called another_window to the first Button widget:
self.button_new_window = ttk.Button(self.frame,
                                       text="New Window",
                                       command=self.another_window)
If we take a look at this function, we can see that we use the TopLevel() command to generate a new window:
win = Toplevel()
After the new window is generated, we can proceed to adding new widgets and other features to this window just as we do for the root:
win.title("Another Window")
label = ttk.Label(win, text="New widgets go here")
label.grid(row=0, column=0)
Pop-Up Windows#
In the next part of our GUI, we demo the showinfo box. Note that this is a much simpler “window” as is used to give a quick message. In this case, we just show the message “This window contains some info” with the following:
showinfo("Window", "This window contains some info")
Note that we imported the showinfo message box at the top of the script:
from tkinter.messagebox import showinfo
There are several different types of messages boxes that can be used for other types of messages (e.g. warnings, errors, etc). A summary of these message boxes is available on the tkinter documentation HERE.
File Menus#
In this final example, we’ll take a look at adding a file menu to our GUIs. This isn’t really a new “window”, but it does allow for some functionality to pull information from our file system from outside of our GUI. Let’s take a look at an example:
# a GUI to demo a file menu

# import the tkinter package
from tkinter import *
from tkinter import ttk

# import the
from tkinter.filedialog import askopenfilename

# import the os module
import os

# create a class called PopupWindows
class PopupWindows:

    # add an init functions for this class
    def __init__(self, root):

        # Add a title to the window
        root.title("Window with File Menu")

        # Define the geometry of the window
        root.geometry("500x200")

        # Make a variable for the file name
        self.chosen_file = StringVar(value='None Chosen Yet')

        # add a Menu to to the window
        menubar = Menu(root)

        # add a file drop-down menu from the top bar with label File
        # add labels for New, Open, Save, and Exit
        # use a choose_file function for Open and a quit function for Exit
        filemenu = Menu(menubar, tearoff=0)
        filemenu.add_command(label="New")
        filemenu.add_command(label="Open", command=self.choose_file)
        filemenu.add_command(label="Save")
        filemenu.add_separator()
        filemenu.add_command(label="Exit", command=root.quit)
        menubar.add_cascade(label="File", menu=filemenu)
        root.config(menu=menubar)

        # Configure the root so that it stretches in all directions
        root.columnconfigure(0, weight=1)
        root.rowconfigure(0, weight=1)

        # make a frame for the GUI
        self.frame = ttk.Frame(root, padding = "10 10 10 10")
        self.frame.grid(column=0, row=0, sticky=(N, W, E, S))

        # weight column to expand with the window
        self.frame.columnconfigure(0, weight=1)

        # add a label for the new window
        label = ttk.Label(self.frame,
                          text="Chosen File",
                          font=('Arial',20))
        label.grid(column=0, row=0, sticky=(N, W, E, S))

        # add a label for the chosen file
        label = ttk.Label(self.frame,
                          textvariable=self.chosen_file,
                          font=('Arial',20))
        label.grid(column=0, row=1, sticky=(N, W, E, S))

    # define a choose_file function to find a file
    # in the file system with the askopenfilename function
    def choose_file(self):
        file_name = askopenfilename(initialdir = os.getcwd())
        file_name = os.path.basename(file_name)
        self.chosen_file.set(file_name)

# create a root Tk object
root = Tk()

# create a PopupWindows object with the Tk root object as an argument
PopupWindows(root)

# call the mainloop method on the Tk root object
root.mainloop()
The script above generates the following GUI:
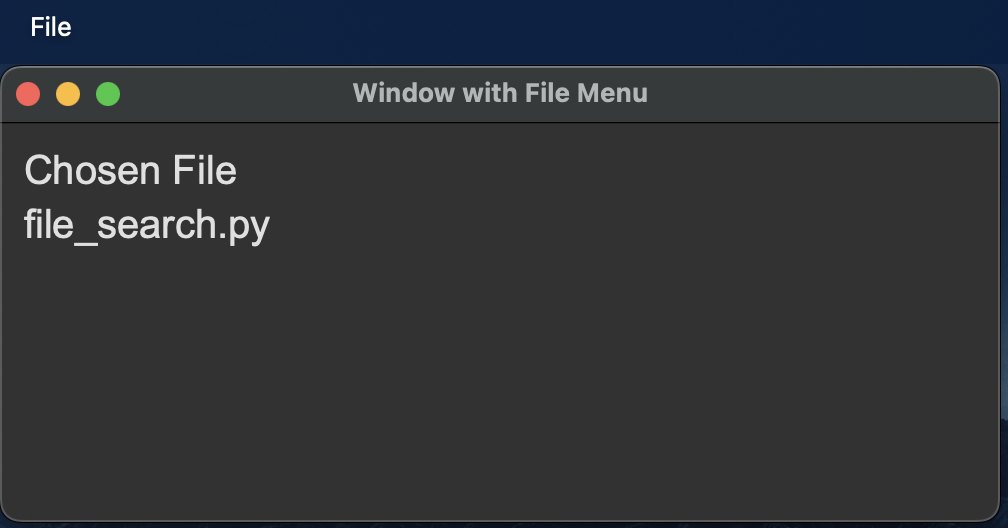
As before, let’s summarize some of the key features. First, we can see that we’ve generate a file menu using the Menu widget:
menubar = Menu(root)
This menu is configured for the root window (i.e. creating a top Menu “bar”) with the following command:
root.config(menu=menubar)
Next, we need to add menus to this menu bar to give it functionality. In this example, we just create one menu for the “File dropdown:
filemenu = Menu(menubar, tearoff=0)
Then, features are added to the menu one at a time. In this example, we have added a “cascade” which drops down from the menu bar.
menubar.add_cascade(label="File", menu=filemenu)
This cascade is then given features, such as the “New” and “Open” features:
filemenu.add_command(label="New")
filemenu.add_command(label="Open", command=self.choose_file)
As we can see, the “New” feature hasn’t been given any functionality yet - it’s really just some text - but the “Open” feature has been bound with the choose_file function. In this function, we define what will happen when “Open” is chosen in the menu. Namelist, we use the askopenfilename feature to open the file selection window. This will return the full path to the file chosen.
file_name = askopenfilename(initialdir = os.getcwd())
file_name = os.path.basename(file_name)
Note that we have imported askopenfilename at the top of the script.
We have also given functionality to the Exit command which closes the window with command=root.quit.